 |
3.3.1 General
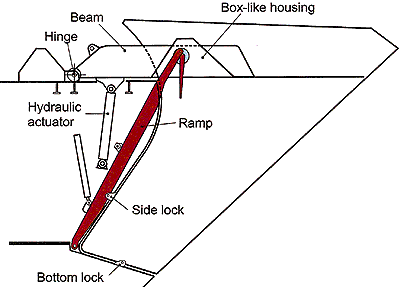
The bow visor and ramp installation of the ESTONIA was of a configuration common on ferries in traffic between Finland and Sweden at the time of her construction. The installation comprised an upward-opening bow visor and a loading ramp, hinged at car-deck level and closed when raised. In closed position, the upper end of the ramp extended into a box-like housing on the deck of the visor.
 The complete bow ramp and the operating and locking devices for the visor as well as the aft ramps and the car platforms were designed and delivered by an independent company, von Tell AB, an established supplier of cargo handling equipment and systems. The design was based on a detailed specification by the shipyard. Von Tell AB used a subcontractor, Grimmereds Verkstads AB, for manufacturing complete sets of components for the ramps, the car platforms and the visor locking devices. The routine contacts between the yard and the supplier were via von Tell GmbH, a subsidiary of von Tell AB. Incorporation of the system into the ship and manufacture of the attachment structure were shipyard work. The equipment delivered by von Tell was identical to that built for the preceding newbuilding, DIANA II, except for the slightly increased length of the ramp and the changes of the car platforms dictated by the greater length of the vessel. According to available information the visor operating and locking system design for DIANA II was the first delivered by von Tell AB. The complete bow ramp and the operating and locking devices for the visor as well as the aft ramps and the car platforms were designed and delivered by an independent company, von Tell AB, an established supplier of cargo handling equipment and systems. The design was based on a detailed specification by the shipyard. Von Tell AB used a subcontractor, Grimmereds Verkstads AB, for manufacturing complete sets of components for the ramps, the car platforms and the visor locking devices. The routine contacts between the yard and the supplier were via von Tell GmbH, a subsidiary of von Tell AB. Incorporation of the system into the ship and manufacture of the attachment structure were shipyard work. The equipment delivered by von Tell was identical to that built for the preceding newbuilding, DIANA II, except for the slightly increased length of the ramp and the changes of the car platforms dictated by the greater length of the vessel. According to available information the visor operating and locking system design for DIANA II was the first delivered by von Tell AB.
 The Bureau Veritas rules valid at the time had no details regarding procedures for calculating sea loads on the bow visor installation. It was stated in general wording that doors should be firmly secured and that structural reinforcements should be made to attachment points of cleats, hinges and jacks. The general wording in the rules also specified that the scantlings of the visor structure should be equivalent to that of the hull itself. The Bureau Veritas rules valid at the time had no details regarding procedures for calculating sea loads on the bow visor installation. It was stated in general wording that doors should be firmly secured and that structural reinforcements should be made to attachment points of cleats, hinges and jacks. The general wording in the rules also specified that the scantlings of the visor structure should be equivalent to that of the hull itself.
 The vertical and longitudinal sea loads to which the bow visor could be exposed were calculated separately by the yard and by the von Tell company. The Bureau Veritas rules gave no detailed guidance for such calculations. The yard therefore used for this purpose nominal “pressure heights” given by Bureau Veritas in a note (Note Documentaire BM2, 5.4.1976), originally issued as general guidance for determining the loads on the bows of large ships. The vertical and longitudinal sea loads to which the bow visor could be exposed were calculated separately by the yard and by the von Tell company. The Bureau Veritas rules gave no detailed guidance for such calculations. The yard therefore used for this purpose nominal “pressure heights” given by Bureau Veritas in a note (Note Documentaire BM2, 5.4.1976), originally issued as general guidance for determining the loads on the bows of large ships.
 The von Tell company used nominal pressure heads per unit of projected area specified in the rules of Lloyd's Register of Shipping, valid at the time. It has not been possible to verify in detail what exchange of information on this issue took place between the yard and the supplier prior to the detailed design of the von Tell equipment. The von Tell company used nominal pressure heads per unit of projected area specified in the rules of Lloyd's Register of Shipping, valid at the time. It has not been possible to verify in detail what exchange of information on this issue took place between the yard and the supplier prior to the detailed design of the von Tell equipment.
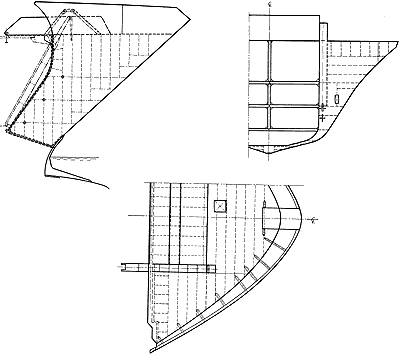
 The general arrangement of the ramp and visor installation is shown in Figure 3.5. The general arrangement of the ramp and visor installation is shown in Figure 3.5.
Figure 3.5 Bow visor and ramp installation.

3.3.2 Detailed technical description of the bow visor
The visor
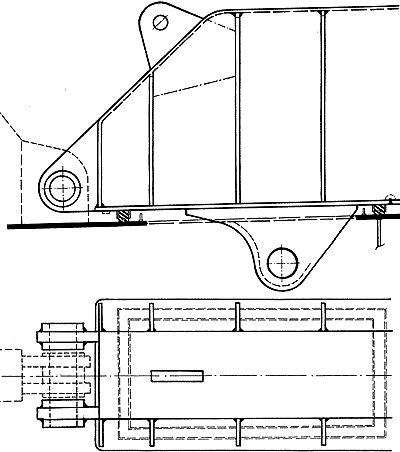
The visor was the most forward part of the vessel's hull and was a steel structure similar to the normal bow structure of a vessel. The general shape and design are shown in Figure 3.6. The visor consisted mainly of the shell plating, being an extension of the ship's shell plating and contour, the deck part, the bottom part, the aft bulkhead and internal horizontal stringers, vertical partial bulkheads and transverse stiffeners. The internal structure was connected with a stiff tubular framework. Two beams on deck extended aft of the visor aft end and carried the hinge arrangements for the pivoting points of the visor. The lowest strake of shell plating was reinforced in order to satisfy the ice class requirements. The visor weighed about 56 t.
Figure 3.6 Bow visor general arrangement and structure.

The visor including attachment devices was built of grade A mild carbon steel (yield strength minimum 235 N/mm2, ultimate tensile strength 400-490 N/mm2).
 The deck of the visor had a box-like housing between the two beams, enclosing the upper part of the ramp when the ramp was closed. The geometry was such that the ramp had to be fully closed in order not to interfere with the visor during its opening and closing. The deck of the visor had a box-like housing between the two beams, enclosing the upper part of the ramp when the ramp was closed. The geometry was such that the ramp had to be fully closed in order not to interfere with the visor during its opening and closing.
 The visor pivoted around the two hinges on the upper deck during its normal opening and closing. It was secured in the closed position by three hydraulically operated locking devices at its lower part. One of these was mounted on the forepeak deck and the other two on the hull front bulkhead with mating lugs on the visor. Additionally, two manual locking devices were located in the area of the hydraulic side locks. Three locating horns, one on the forepeak deck and two on the front bulkhead, engaged recesses in the visor in order to guide the visor to its proper position when being closed and to absorb lateral loads. The visor pivoted around the two hinges on the upper deck during its normal opening and closing. It was secured in the closed position by three hydraulically operated locking devices at its lower part. One of these was mounted on the forepeak deck and the other two on the hull front bulkhead with mating lugs on the visor. Additionally, two manual locking devices were located in the area of the hydraulic side locks. Three locating horns, one on the forepeak deck and two on the front bulkhead, engaged recesses in the visor in order to guide the visor to its proper position when being closed and to absorb lateral loads.
 The visor was supported vertically in the closed position by the two deck hinges and rested further on three points on the forepeak deck. One of these was the solid stem post of the visor, resting on the ice-breaking stem on top of the bulbous bow, the other two were steel pads on the forepeak deck. The three locking devices kept the visor down in its closed position and the locating horns absorbed any side loads that might develop. Longitudinal loads were carried by the hinges, the locking devices and possibly by direct contact between the visor and the front bulkhead of the hull. The visor was supported vertically in the closed position by the two deck hinges and rested further on three points on the forepeak deck. One of these was the solid stem post of the visor, resting on the ice-breaking stem on top of the bulbous bow, the other two were steel pads on the forepeak deck. The three locking devices kept the visor down in its closed position and the locating horns absorbed any side loads that might develop. Longitudinal loads were carried by the hinges, the locking devices and possibly by direct contact between the visor and the front bulkhead of the hull.
 The visor was supported in the open position by the two hinges and two parking devices consisting of hydraulically operated bolts engaging lugs on the hinge beams. The visor was supported in the open position by the two hinges and two parking devices consisting of hydraulically operated bolts engaging lugs on the hinge beams.
 Rubber seals supported by steel flat bars were installed on the forepeak deck and the front bulkhead, together making a continuous seal against which the visor abutted when closed. Rubber seals supported by steel flat bars were installed on the forepeak deck and the front bulkhead, together making a continuous seal against which the visor abutted when closed.
The bottom lock
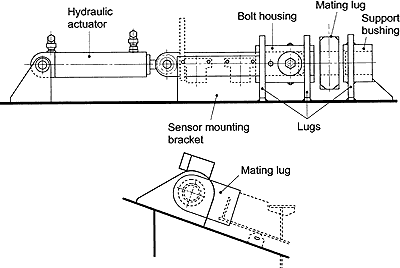
The bottom locking arrangement is shown in Figure 3.7. The bottom lock was sometimes named the “Atlantic lock” as it was not in common use in early ferries but was later introduced to enable similar ferries to cross open oceans. The “Atlantic lock” had become established by the time the ESTONIA was built. The locking device consisted of a locking bolt, movable horizontally in a transverse direction, guided in a bolt housing. In extended position the tip of the bolt engaged a support bushing. The bolt housing was fixed to the forepeak deck by means of two steel lugs and the bushing was installed in a third similar lug. A mating lug, attached to the bottom structure of the visor, was located between the bolt housing and the support bushing when the visor was closed and the extended bolt then engaged the hole in the mating lug.
Figure 3.7 Bottom locking device installation on forepeak deck.

The bolt was moved in the bolt housing between the retracted position and the extended position by means of a hydraulic actuator, operated from the visor and ramp control panel as described in 3.3.5. A spring-loaded mechanical plunger, movable perpendicularly to the bolt, engaged grooves in the bolt in the open and closed positions respectively, thereby securing the bolt mechanically in its extreme positions regardless of hydraulic pressure. The bolt was also locked hydraulically at any time because the hydraulic fluid was trapped in the system, regardless of whether the system was under pressure or not.
 Two magnetic position sensors were installed, actuated by a magnet attached to a bracket on the bolt. The sensors were actuated when the bolt was fully retracted or fully extended. The hydraulic control system as well as the arrangement and functioning of the sensors and the position indication and alarm system are covered separately in 3.3.5. The original mechanical switches were replaced by the magnetic sensors in the mid-1980s. Two magnetic position sensors were installed, actuated by a magnet attached to a bracket on the bolt. The sensors were actuated when the bolt was fully retracted or fully extended. The hydraulic control system as well as the arrangement and functioning of the sensors and the position indication and alarm system are covered separately in 3.3.5. The original mechanical switches were replaced by the magnetic sensors in the mid-1980s.
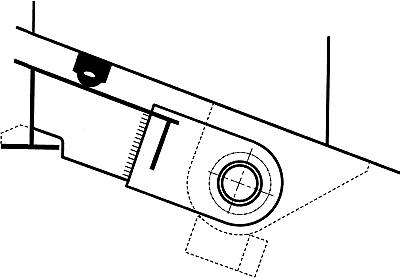
 The mating lug in the bottom structure of the visor consisted of a single steel lug, welded to a transverse beam of the visor bottom structure and supported by a bracket as shown in Figure 3.8. The diameter of the bolt was 80 mm in the original von Tell drawing. The lug had a hole for the locking bolt with an original diameter of 85 mm. The mating lug in the bottom structure of the visor consisted of a single steel lug, welded to a transverse beam of the visor bottom structure and supported by a bracket as shown in Figure 3.8. The diameter of the bolt was 80 mm in the original von Tell drawing. The lug had a hole for the locking bolt with an original diameter of 85 mm.
Figure 3.8 Lug of visor, mating the bottom locking device.

The failure mode of the bottom lock installation and related findings are covered in Chapters 8 and 15.
The side locks
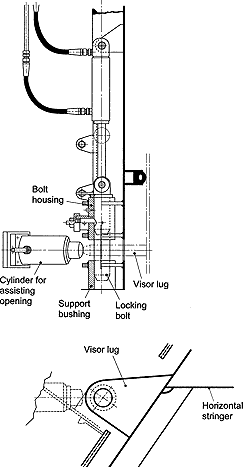
The side locks consisted of two lugs, attached to the aft bulkhead of the visor and extending, when the visor was closed, into two recesses in the front bulkhead of the hull, one at each side of the ramp opening. The visor lugs overlapped a horizontal stringer. In the closed position, hydraulically-operated bolts engaged holes in the lugs. The arrangement is shown in Figure 3.9. The hydraulic bolt installations were similar to that of the bottom lock, i.e. a bolt moving in a housing and, when extended, engaging a support bushing. The visor lug inserted between the bolt housing and the support bushing. The bolt was moved by a hydraulic actuator. A spring-loaded mechanical plunger was installed. The position of the bolt, fully retracted and fully extended, was sensed by magnetic position sensors.
Figure 3.9 Side locking device, port and starboard.

Additional hydraulic cylinders were installed at each side to push forward on the visor lugs when the visor was to open. This installation was intended to assist in breaking the visor open in case it had become stuck in the closed position due to icing.
 Two local vertical stiffeners on the forward side of the visor bulkhead plating were separated by a distance slightly larger than the thickness of the lug itself. These stiffeners were installed to satisfy a Bureau Veritas surveyor's requirement, as written on the bow visor assembly drawing, for “local reinforcements of the ship's structures in way of locking devices”. The fillet weld of one of the stiffeners had some overlap with the fillet weld of the side-locking lug on the opposite side of the bulkhead plating. No other arrangements were made in the design to transmit forces from the lugs into the structure of the visor. Two local vertical stiffeners on the forward side of the visor bulkhead plating were separated by a distance slightly larger than the thickness of the lug itself. These stiffeners were installed to satisfy a Bureau Veritas surveyor's requirement, as written on the bow visor assembly drawing, for “local reinforcements of the ship's structures in way of locking devices”. The fillet weld of one of the stiffeners had some overlap with the fillet weld of the side-locking lug on the opposite side of the bulkhead plating. No other arrangements were made in the design to transmit forces from the lugs into the structure of the visor.
Manual visor locks
Two manual locks were installed, one at each side and mounted just below the hydraulic side locks. Each lock consisted of two lugs welded to the aft side of the visor and a hinged eye bolt with nut, mounted between two lugs in the front bulkhead as shown in Figure 3.10. In closed position the eye bolt was swung into position between the two lugs in the visor and the nut was tightened down. The locks had no remote position indicating devices.
Figure 3.10 Manual locking device, port and starboard.

The manual locks were described in the supplier's instruction manual as “reserve”. No advice was given anywhere in instructions from the maker, the shipyard or operators as to the use of these manual locks.
The deck hinges
The two beams on the deck of the visor extended about 3 metres aft of the visor. Each beam had a box structure, including heavy-gauge side plates, top and bottom plates and various internal and external brackets and stiffeners. The ends of the beam side plates carried the hinge arrangements (Figure 3.11). A heavy steel bushing was welded into a hole in each of the two side plates of each beam. The bushings had a bore, carrying a bronze bushing.
Figure 3.11 Arrangement of deck hinges and deck beams.

The deck part of the hinge consisted of two lugs welded to the deck, carrying between them a steel housing. This deck part was located, in the installed arrangement, between the two bushings of a visor beam. A steel shaft was installed through the entire assembly, secured by locking plates bolted to the outer ends of the hinge bushings. The bearings were lubricated through drillings in the shaft and grease nipples at its ends.
3.3.3 Design documentation for the bow visor and its locking devices
As mentioned in 3.3.1 the shipyard calculated the vertical and longitudinal total forces on the bow visor. The loads so arrived at were assumed to act in the centre of the projected areas. The total vertical force, 536 t, was in the calculations (see Supplement) distributed evenly between all five attachment points, including the hinge points. The total longitudinal force was calculated to 381 t. By a procedure analysed in more detail in Chapter 15, the calculations arrived at a design load of 100 t per attachment point.
 These calculations were hand-written and were intended to determine design data for minimum effective cross-section of a lug. By assuming high-tensile strength steel, an allowable tensile stress of 164 N/mm2 was used, indicating a required minimum cross-section of 6100 mm2 in the loaded direction of the locking device. These calculations were not dated and they were not submitted to Bureau Veritas for examination. These calculations were hand-written and were intended to determine design data for minimum effective cross-section of a lug. By assuming high-tensile strength steel, an allowable tensile stress of 164 N/mm2 was used, indicating a required minimum cross-section of 6100 mm2 in the loaded direction of the locking device. These calculations were not dated and they were not submitted to Bureau Veritas for examination.
 The normal drawings were submitted to Bureau Veritas for examination and approval, including the following: The normal drawings were submitted to Bureau Veritas for examination and approval, including the following:
- 590/1103 rev 6, Bugklappe, Meyer Werft (Bow visor, Meyer Yard)
- 590/1106 rev G, Bugklappeverrieglung, Meyer Werft (Bow visor locking devices)
- 49111-373 Atlantiksicherung, von Tell (Atlantic lock)
- 590/1101a, Vorshiff, spt 149-vorne bis A-Deck, Meyer Werft (Foreship from frame 149 to fore end and up to A deck)
- 49111-372, Automatische und manuelle Verschlussanordnungen für Bugklappe, von Tell (Automatic and manual locking devices of bow visor)
- 49111-330, Bugklappe und Bugrampe Zusammenstellung, von Tell (Bow visor and bow ramp assembly)
The Bureau Veritas surveyor examining the drawings made by the shipyard and by von Tell made various additional notes in conjunction with the examination. On the von Tell assembly drawing for the ramp and the visor it was stated that the arrangement of the locking devices should be subject to approval by the national administration. This drawing was approved by Bureau Veritas in November 1979. The shipyard assembly drawing for the visor likewise had a remark that the arrangement of the locking devices should be subject to approval by the national administration. It further carried a note requiring “local reinforcements of the ship's structures in way of locking devices, cylinders and hinges to the surveyor's satisfaction”, and a note requiring that the lifting lugs, the bottom lock visor lug and the side lock lugs should be made of grade St52-3 steel (high-tensile strength steel to cold toughness class 3). This shipyard drawing was not approved until 20 June 1980, as the drawing had only then been submitted to Bureau Veritas. The yard, however, learned informally about the note on the von Tell drawing through the Bureau Veritas site surveyor in March 1980.
 There was also correspondence about approval of the drawings in December 1979 when the von Tell company asked the Finnish Maritime Administration which drawings the Administration wanted to examine and approve. The Administration replied that it assumed that all drawings had been approved by Bureau Veritas and that it was satisfied with this unless any matter of interpretation of the rules should arise. No reference was made in this correspondence to the Bureau Veritas note about approval of the locking devices. There was also correspondence about approval of the drawings in December 1979 when the von Tell company asked the Finnish Maritime Administration which drawings the Administration wanted to examine and approve. The Administration replied that it assumed that all drawings had been approved by Bureau Veritas and that it was satisfied with this unless any matter of interpretation of the rules should arise. No reference was made in this correspondence to the Bureau Veritas note about approval of the locking devices.
 Further telex communication about approvals took place between Bureau Veritas and von Tell in March 1980 when von Tell was questioned about the loads applied in the design of the locking devices. The von Tell design office explained that it had, lacking detailed guidance in the Bureau Veritas' rules, used the Lloyd's Register of Shipping rules. These calculations had indicated a load on each locking device of about 80 t, and this value had been used in the design of the locking bolts. In the same telex, von Tell expressed their concern about the stresses, presumably in the locking bolts, which were slightly above the stresses permitted by Lloyd's Register of Shipping. These calculations were not submitted to Bureau Veritas for examination. Further telex communication about approvals took place between Bureau Veritas and von Tell in March 1980 when von Tell was questioned about the loads applied in the design of the locking devices. The von Tell design office explained that it had, lacking detailed guidance in the Bureau Veritas' rules, used the Lloyd's Register of Shipping rules. These calculations had indicated a load on each locking device of about 80 t, and this value had been used in the design of the locking bolts. In the same telex, von Tell expressed their concern about the stresses, presumably in the locking bolts, which were slightly above the stresses permitted by Lloyd's Register of Shipping. These calculations were not submitted to Bureau Veritas for examination.
 The von Tell company made detailed and assembly drawings for the various part systems and components delivered by them. In the case of the bottom lock the assembly drawing indicated three mounting lugs to the ship structure, compatible with the overall design of the locking device. Similarly the side locking lugs were identified on the assembly drawing for the side locking devices. The parts were identified as “Werftlieferung” (shipyard supply) on the drawings. Main dimensions of these parts were indicated although no normal manufacturing information. The drawings did not make it clear whether the information given was for reference purposes only or was intended as guidance for manufacturing. The von Tell company made detailed and assembly drawings for the various part systems and components delivered by them. In the case of the bottom lock the assembly drawing indicated three mounting lugs to the ship structure, compatible with the overall design of the locking device. Similarly the side locking lugs were identified on the assembly drawing for the side locking devices. The parts were identified as “Werftlieferung” (shipyard supply) on the drawings. Main dimensions of these parts were indicated although no normal manufacturing information. The drawings did not make it clear whether the information given was for reference purposes only or was intended as guidance for manufacturing.
 The shipyard steel drawing for the bow visor (590/1103) indicated the mounting of the mating lug for the bottom lock and also the lugs for the side locks. No welding instructions were given for these detailed parts on the shipyard drawing, nor in von Tell drawings 49111-372 and 49111-373. No arrangements for structural continuity behind the devices were shown. The shipyard steel drawing for the bow visor (590/1103) indicated the mounting of the mating lug for the bottom lock and also the lugs for the side locks. No welding instructions were given for these detailed parts on the shipyard drawing, nor in von Tell drawings 49111-372 and 49111-373. No arrangements for structural continuity behind the devices were shown.
 A group of experts appointed by the shipyard to investigate the ESTONIA accident have commented on some of the conclusions in the Commission's Part-Report and inter alia stated the following: A group of experts appointed by the shipyard to investigate the ESTONIA accident have commented on some of the conclusions in the Commission's Part-Report and inter alia stated the following:
“ a.) Contrary to the practice of other newbuilding yards Meyer Werft designers do not state the required thickness of welding seams individually on the respective drawings, but make up a so-called ”welding table” for each newbuilding. In this table the minimum thickness of welding seams for particular structural parts is stated. The table is approved by the class. - b.) In case the particular structural part to be welded does not fall under the categories listed up in the welding table, the welder follows the yard welding standard. - c.) The yard welding standard requires a welding seam thickness for structural parts accessible from both sides, e.g. bushings to be welded into the lugs of the Atlantic lock, to correspond to at least 50 % of the thickness of the part to be welded and 70 % as a maximum value. In other words, a structural part welded respectively is connected by welding seams corresponding to at least 100 % of its own cross-section”.
No detailed assembly drawing existed for the side locks although an extract from the von Tell assembly drawing for the side lock and with the lug bottom length of 370 mm added is said to have been released to the workshop for manufacturing. The length indicated on the yard assembly drawing of the visor was about 550 mm. The lugs for the side locks were shown fitted by fillet welds to the flat surface of the aft bulkhead of the visor, being a plate of 8 mm in thickness.
 Some other discrepancies have been noted between the steel drawing for the visor and the actual installation in the visor as recovered. These include the absence of some longitudinal and transverse stiffeners in the bottom structure of the visor. This matter is further covered in 8.12. Some other discrepancies have been noted between the steel drawing for the visor and the actual installation in the visor as recovered. These include the absence of some longitudinal and transverse stiffeners in the bottom structure of the visor. This matter is further covered in 8.12.
3.3.4 Detailed technical description of the bow loading ramp
The ramp was a steel design with four longitudinal beams and a number of transverse beams. A steel plate made up the upper surface of the ramp. Additional stiffeners were arranged between the main beams.
 The ramp was longer than the available deck height and therefore protruded by about 1.2 m above the level of the upper deck (deck 4) when in the raised, i.e. closed, position. This extension was enclosed in the box-like housing on the visor deck. Flaps at the tip of the ramp were hinged along its front end and were controlled by means of steel cables to extend when the ramp was lowered. The cables were engaged on bellcranks at the ends of the flap axis. When the ramp was closed these flaps hung down to keep its total length as short as possible. The ramp was longer than the available deck height and therefore protruded by about 1.2 m above the level of the upper deck (deck 4) when in the raised, i.e. closed, position. This extension was enclosed in the box-like housing on the visor deck. Flaps at the tip of the ramp were hinged along its front end and were controlled by means of steel cables to extend when the ramp was lowered. The cables were engaged on bellcranks at the ends of the flap axis. When the ramp was closed these flaps hung down to keep its total length as short as possible.
 The ramp was hinged at its aft end to the hull structure by four hinges. Each hinge consisted of a steel lug welded to the hull and two lugs welded to the aft beam of the ramp. Bushings and hinge pins completed the hinge installation. The outer hinges were heavier than the two inner ones. The ramp was hinged at its aft end to the hull structure by four hinges. Each hinge consisted of a steel lug welded to the hull and two lugs welded to the aft beam of the ramp. Bushings and hinge pins completed the hinge installation. The outer hinges were heavier than the two inner ones.
 Raised bars were welded onto the sides of the ramp. Fixed railings were mounted on each side. Raised bars were welded onto the sides of the ramp. Fixed railings were mounted on each side.
 The ramp was manoeuvred by two hydraulic actuators, one at each side. Preventer wires served to avoid excessive opening. When in the raised, closed, position the ramp was pulled in by two locking hooks, engaging pins in the side beams of the ramp. These hooks were hydraulically operated via a lever mechanism arranged to move past its dead centre during the locking movement and to stay in this mechanically secured position. The ramp was manoeuvred by two hydraulic actuators, one at each side. Preventer wires served to avoid excessive opening. When in the raised, closed, position the ramp was pulled in by two locking hooks, engaging pins in the side beams of the ramp. These hooks were hydraulically operated via a lever mechanism arranged to move past its dead centre during the locking movement and to stay in this mechanically secured position.
 Two additional wedge-shaped locking bolts were mounted along each side of the ramp. These were hydraulically operated, moving transversely in the ramp coaming. In the extended position they engaged box-like extensions on the ramp side bars. Mechanical friction plungers were installed in each locking bolt housing. Two additional wedge-shaped locking bolts were mounted along each side of the ramp. These were hydraulically operated, moving transversely in the ramp coaming. In the extended position they engaged box-like extensions on the ramp side bars. Mechanical friction plungers were installed in each locking bolt housing.
 All the locking devices had position sensors for their retracted and extended positions as described separately in 3.3.5. All the locking devices had position sensors for their retracted and extended positions as described separately in 3.3.5.
 A rubber seal, supported by steel flat bars, was arranged in the ramp coaming and formed a weathertight seal against the surface of the ramp when the ramp was in the closed position. A rubber seal, supported by steel flat bars, was arranged in the ramp coaming and formed a weathertight seal against the surface of the ramp when the ramp was in the closed position.
3.3.5 Actuating, monitoring and control systems for the bow visor and the ramp
A control system served the ramp and visor installation. The system was supplied by the maker of the ramp and visor actuating systems. It was described in an instruction booklet issued by the supplier.
 The control system consisted of a high-pressure hydraulic system with tank and three pumps plus the normal components of a hydraulic power system, providing hydraulic power to a control panel and to the visor and ramp operating and locking devices. The original hydraulic pumps which had been set to provide 180 bar pressure had been replaced in the mid-80s due to their inability to give adequate pressure. The new pumps had a maximum pressure rating of 400 bar and were set to deliver 225 bar to the system. The control system consisted of a high-pressure hydraulic system with tank and three pumps plus the normal components of a hydraulic power system, providing hydraulic power to a control panel and to the visor and ramp operating and locking devices. The original hydraulic pumps which had been set to provide 180 bar pressure had been replaced in the mid-80s due to their inability to give adequate pressure. The new pumps had a maximum pressure rating of 400 bar and were set to deliver 225 bar to the system.
 The two cylinders for opening the visor operated in parallel, the operating speed limited by restrictor valves. No other devices were incorporated for ensuring that operating speeds of the two cylinders remained equal. The two cylinders for opening the visor operated in parallel, the operating speed limited by restrictor valves. No other devices were incorporated for ensuring that operating speeds of the two cylinders remained equal.
 The control panel was mounted on the car deck at the port side, just aft of the ramp. It contained manual control levers for separately operating: The control panel was mounted on the car deck at the port side, just aft of the ramp. It contained manual control levers for separately operating:
- the visor bottom lock
- the visor side locks
- the open visor parking plungers
- visor opening/closing
- the ramp pull-in hooks and locking bolts
- ramp opening/closing.
The opening/closing control for the ramp and the visor was effected by solenoid valves so connected that the visor could only be manoeuvred when the ramp was closed and the ramp could only be opened when the visor was open. The interlock system further ensured that the ramp and the visor, respectively, could only be manoeuvred when the related locking devices were open.
 In normal operation the indicator lamps were monitored by the operator for proper function of each step during opening or closing, before the next step was activated. In normal operation the indicator lamps were monitored by the operator for proper function of each step during opening or closing, before the next step was activated.
 The panel had red and green lights, powered via the sensors at the actuators for the visor and ramp locking devices. Position sensors were also installed to sense fully closed or fully open visor and fully closed ramp, respectively. The panel had red and green lights separately for the bottom lock, the side locks, the parking devices, the ramp locking devices, and the positions of the visor and the ramp. The lamps for the locking devices were controlled separately by one position sensor for retracted position and one for extended. The panel had red and green lights, powered via the sensors at the actuators for the visor and ramp locking devices. Position sensors were also installed to sense fully closed or fully open visor and fully closed ramp, respectively. The panel had red and green lights separately for the bottom lock, the side locks, the parking devices, the ramp locking devices, and the positions of the visor and the ramp. The lamps for the locking devices were controlled separately by one position sensor for retracted position and one for extended.
 The sensors for the visor side locks were wired in series as were those for the parking devices. Should any locking bolt be in an intermediate position no switch was activated and neither the red nor the green lamp was illuminated for that function. The sensors for the visor side locks were wired in series as were those for the parking devices. Should any locking bolt be in an intermediate position no switch was activated and neither the red nor the green lamp was illuminated for that function.
 Visor position was indicated by two sensors, one for “fully closed” and one for “parked”. The “fully closed” sensor was mounted on the port manual locking device. Both positions were indicated with green lamps. A red “parked visor” lamp was on at all times when the parking bolts were retracted and was thus on at sea. Visor position was indicated by two sensors, one for “fully closed” and one for “parked”. The “fully closed” sensor was mounted on the port manual locking device. Both positions were indicated with green lamps. A red “parked visor” lamp was on at all times when the parking bolts were retracted and was thus on at sea.
 The panel section for ramp operation had red and green lamps for the locking devices, all wired in series. A red or a green lamp would come on only when all the locking devices had moved to the required position. If one device was in an intermediate position no lamp would come on. An independent position sensor mounted at the upper port side of the ramp coaming indicated fully closed ramp by showing green. There was no lamp for open ramp. The panel section for ramp operation had red and green lamps for the locking devices, all wired in series. A red or a green lamp would come on only when all the locking devices had moved to the required position. If one device was in an intermediate position no lamp would come on. An independent position sensor mounted at the upper port side of the ramp coaming indicated fully closed ramp by showing green. There was no lamp for open ramp.
 It has been stated that the lower locking bolt on the port side of the ramp sometimes failed to go to fully extended position. The standard procedure was then to retract the bolt and again command it to locked position, whereby it would normally go to fully extended position and the green indicator lamp would come on. It has been stated that the lower locking bolt on the port side of the ramp sometimes failed to go to fully extended position. The standard procedure was then to retract the bolt and again command it to locked position, whereby it would normally go to fully extended position and the green indicator lamp would come on.
 The position indicators for the visor side locks and for ramp locking were also wired to the bridge, with one set of red and green lamps for the visor side locks and one set for the ramp locking devices. The actual position of the visor itself or the ramp itself was not shown on the bridge indicator panel, nor was the position of the bottom locking device. The lamps on the bridge would only come on if all the devices wired in series for that function, i.e. both side locks for the visor and all six locking devices for the ramp, respectively, were in the required position. The position indicators for the visor side locks and for ramp locking were also wired to the bridge, with one set of red and green lamps for the visor side locks and one set for the ramp locking devices. The actual position of the visor itself or the ramp itself was not shown on the bridge indicator panel, nor was the position of the bottom locking device. The lamps on the bridge would only come on if all the devices wired in series for that function, i.e. both side locks for the visor and all six locking devices for the ramp, respectively, were in the required position.
 The indicator panel was mounted in the front console of the bridge, starboard of the seat of the officer of the watch. The indicator panel was mounted in the front console of the bridge, starboard of the seat of the officer of the watch.
 Four TV cameras were installed for monitoring the car deck. One fixed camera monitored the area of the forward ramp and one the aft ramps. One turnable camera admidships at each side of the casing was for monitoring the rest of the car deck area. The cameras were operated independently from a control panel with monitor on the bridge. A second monitor and control panel were installed in the engine control room. Four TV cameras were installed for monitoring the car deck. One fixed camera monitored the area of the forward ramp and one the aft ramps. One turnable camera admidships at each side of the casing was for monitoring the rest of the car deck area. The cameras were operated independently from a control panel with monitor on the bridge. A second monitor and control panel were installed in the engine control room.
 The indicator lamps on the bridge for the bow visor and ramp had been installed from the beginning. The monitoring cameras had been fitted later as a consequence of more stringent requirements following the HERALD OF FREE ENTERPRISE accident. The original indicator lamps on the bridge had been found adequate by the Finnish Maritime Administration for compliance with the new SOLAS Reg II-1/23-2 as applicable to existing ships. The indicator lamps on the bridge for the bow visor and ramp had been installed from the beginning. The monitoring cameras had been fitted later as a consequence of more stringent requirements following the HERALD OF FREE ENTERPRISE accident. The original indicator lamps on the bridge had been found adequate by the Finnish Maritime Administration for compliance with the new SOLAS Reg II-1/23-2 as applicable to existing ships.
3.3.6 Surveys, maintenance, damage and repairs
Survey of the bow visor and ramp for class was part of the continuous hull survey scheme. The bow door area was last inspected under this five-year rolling scheme in October 1993. No remarks related to the bow visor and the ramp have been recorded from any of these surveys.
 Maintenance of the operating and control system was, after the one-year guarantee period during the Finnish flag period, carried out by the Turku service base of the MacGregor group. The piston rod end bearing and pin for the port visor opening actuator were renewed in May 1990 due to play. New rubber seals for the visor and ramp had been supplied almost yearly. No other discrepancies had been recorded or other work carried out. Maintenance of the operating and control system was, after the one-year guarantee period during the Finnish flag period, carried out by the Turku service base of the MacGregor group. The piston rod end bearing and pin for the port visor opening actuator were renewed in May 1990 due to play. New rubber seals for the visor and ramp had been supplied almost yearly. No other discrepancies had been recorded or other work carried out.
 The visor locking devices and their operation were inspected every year by the MacGregor service base in Turku. The locking devices operated properly every time. According to information obtained from the service base it is very unlikely that any repair work would have been done on the visor locking devices without their knowledge during the period they maintained the operating and control system. The visor locking devices and their operation were inspected every year by the MacGregor service base in Turku. The locking devices operated properly every time. According to information obtained from the service base it is very unlikely that any repair work would have been done on the visor locking devices without their knowledge during the period they maintained the operating and control system.
 Just before transfer to Estonian flag at the end of 1992 attention had been given to the strength of the ramp and visor locking devices and a quotation for reinforcing them had been requested by Wasa Line. However, nothing was made to the locking devices. Just before transfer to Estonian flag at the end of 1992 attention had been given to the strength of the ramp and visor locking devices and a quotation for reinforcing them had been requested by Wasa Line. However, nothing was made to the locking devices.
 After transfer to Estonian flag no more service work was carried out by the MacGregor service base in Turku as the regular maintenance was carried out by the ship's crew and, according to the new owners, no need for external service had developed. New rubber seals had, however been ordered. It was known that the play in the ramp hinges was approaching the point where corrective action would be needed. After transfer to Estonian flag no more service work was carried out by the MacGregor service base in Turku as the regular maintenance was carried out by the ship's crew and, according to the new owners, no need for external service had developed. New rubber seals had, however been ordered. It was known that the play in the ramp hinges was approaching the point where corrective action would be needed.
 The locking bolt position sensors of the visor's locks were originally of mechanical type. These were replaced whilst the ship was still on the Turku-Stockholm route by sensors of magnetic type, being less sensitive to moisture. The locking bolt position sensors of the visor's locks were originally of mechanical type. These were replaced whilst the ship was still on the Turku-Stockholm route by sensors of magnetic type, being less sensitive to moisture.
 Minor routine welding repairs had been carried out on the mating boxes for the ramp locking bolts whilst the ship was in service in the Gulf of Bothnia. Local welding of a crack in a stiffener underneath the mounting platform for the port side visor actuator has been noted. Minor routine welding repairs had been carried out on the mating boxes for the ramp locking bolts whilst the ship was in service in the Gulf of Bothnia. Local welding of a crack in a stiffener underneath the mounting platform for the port side visor actuator has been noted.
 One of the visor hinge pins had, according to verbal information, a tendency to move out of position, breaking away the locking plate. This was repaired once at the Finnboda yard by pushing the hinge pin back in place and drilling for new locking bolts. One of the visor hinge pins had, according to verbal information, a tendency to move out of position, breaking away the locking plate. This was repaired once at the Finnboda yard by pushing the hinge pin back in place and drilling for new locking bolts.
 No other repair was, according to available information and extensive search, carried out during the lifetime of the vessel on or in the areas of the various operating and locking devices for the ramp and the visor. No other repair was, according to available information and extensive search, carried out during the lifetime of the vessel on or in the areas of the various operating and locking devices for the ramp and the visor.
 As mentioned in 3.2.10, damage due to ice was recorded in 1982, 1985 and 1987. Damage to the bow visor occurred at those times. The first-mentioned was minor and was not claimed from the hull insurance company. The last one was the most extensive and included replacement of the strake of plating next above the one originally reinforced, i.e. the second-lowest strake on the visor and at the corresponding level somewhat aft of the visor. The thickness of the plating was increased from the original 14 mm to 20 mm (the thickness of the lowest strake was 28 mm). The extent of this repair is illustrated in Figure 3.12. No damage was recorded and no work was done to the bottom or the stem post of the visor, or to the locking devices. As mentioned in 3.2.10, damage due to ice was recorded in 1982, 1985 and 1987. Damage to the bow visor occurred at those times. The first-mentioned was minor and was not claimed from the hull insurance company. The last one was the most extensive and included replacement of the strake of plating next above the one originally reinforced, i.e. the second-lowest strake on the visor and at the corresponding level somewhat aft of the visor. The thickness of the plating was increased from the original 14 mm to 20 mm (the thickness of the lowest strake was 28 mm). The extent of this repair is illustrated in Figure 3.12. No damage was recorded and no work was done to the bottom or the stem post of the visor, or to the locking devices.
Figure 3.12 The extent of ice damage repair in 1987.

Continues... |
 |

